
04—augmented reality is fascinating, but the quality is questionable
In this article, we will take a look at Apple's augmented reality technology. You will learn about its possibilities and limitations and discover how to convert any 3D model and make it work the same way Apple does, so you will be able to present your ideas or products to your target audience in an entirely new way.
Hi, I’m Miro, and I will be your guide in this extensive article.
INTRODUCTION
Although my experience in three-dimensional design easily exceeds ten years, I am not an augmented reality expert by any means. Nevertheless, after Apple’s Vision Pro was introduced, I was curious about how to take advantage of this technology in my designs, what Apple’s approach is in this industry, how good the render quality is, and where the limitations are. The short answer is that there are numerous limitations, so be ready for some criticism.
In this journal post, I will be focusing on Apple’s augmented reality approach and technologies. You should probably take this article as an introduction to the industry from the point of view of someone who came from the physically-based rendering industry and has a strong appreciation for photorealism. So, expect some thoughts from my perspective. I assure you that before I wrote this down, I also did a bunch of research; hence, I am certain this article will give you a pretty good understanding of the possibilities and current state of augmented reality, especially if you’re thinking about getting started with it.
HOW IT WORKS
Let's get started at Apple's doorstep though. As you may know, you can find all of Apple’s products in augmented reality through your iPhone or iPad by visiting their product pages for years. If you haven’t tried this before, I encourage you to do so to become familiar with the topic and gain some first-hand experience.
screenshot of the augmented reality model of Apple’s Vision Pro
Navigation through Apple’s augmented reality interface is intuitive. Everything works smoothly and fast, and you don’t need to download any app to view the model in your space or learn anything to make it work out. But there’s a catch. This is true only if you are on an iPhone or iPad. On a Mac, you can find a way to download the models; however, you are getting shortened on previewing the model at your space due to obvious reasons—but again, you don’t need to install any app for that; you will be able to pan, zoom or rotate the object using Quick Look or native Preview app. Additionally, you can play with it even further in a variety of 3D software that supports¹ this new file format called USDZ.
¹ USDZ file format is already supported in many 3D software like Maya, 3ds Max, Fusion 360, Blender, SketchUp, and more using third-party plugins.
HOW IT REALLY WORKS
The USD acronym stands for Universal Scene Description. While the USDZ extension variation just means that it is a zip-compressed USD file, hence the letter Z in the name. USD is now a commonly known and beloved format for sharing 3D scenes across multiple users or studios. It is quite a big deal in the animation and film industry. USDZ was developed by Pixar and Apple, and it is designed to be a highly optimized format for sharing 3D models. I readily agree with the part about the optimized format, but not so much on the universal aspect, which may be true for the developers and some creators using professional 3D software, but this format was also designed for the end users. So, while a huge part of the mass market can preview this file’s content, the rest can’t simply because they choose a different cellphone—that’s not a universal solution. We can’t even solely blame Apple for this. USDZ format, the same way as USD, is an open source, however, no one has adopted its functionality for the mass market. It’s Google’s and Microsoft’s turn.
If you are interested and want to learn more about the USDZ format’s specifications, click here: USDZ File Format Specification
RENDER QUALITY
To clarify, render quality refers to the level of detail and realism achieved in the final outputs. It compares how well a render engine translates and presents visual information. The rendering quality depends on two main factors: the render engine’s capabilities and the complexity of the materials.
Apple claims they use Physically-Based Rendering, which sounds fantastic, nonetheless, I am not that convinced by this statement. Although it may technically fit the category, I'm uncertain about accepting this label. Apple’s render engine behaves like biased renderers, which means it’s limited in some ways; usually, you can decide what shortcuts you take to trade the physically accurate aspect with the render time, and you also limit how the material should behave in a specific environment and situation, but the human eye is not good enough at predicting how the materials should behave in specific situations and lighting conditions. That’s a fact. The render engine itself is limited and does not count with some complex lighting situations, such as how much light will be absorbed and refracted and what caustics should be cast. The result just tries to convince your eyes that what you see looks quite convincing.
You don’t get photorealism from augmented reality yet, which makes sense while it aims to work in real-time, similar to games. In other words, you sacrifice the image quality to have the scene with a high framerate while preserving the battery life of the mobile devices and storing files in as small sizes as possible. This is where the highly optimized USDZ file format shines.
MATERIALS BEHAVIOR
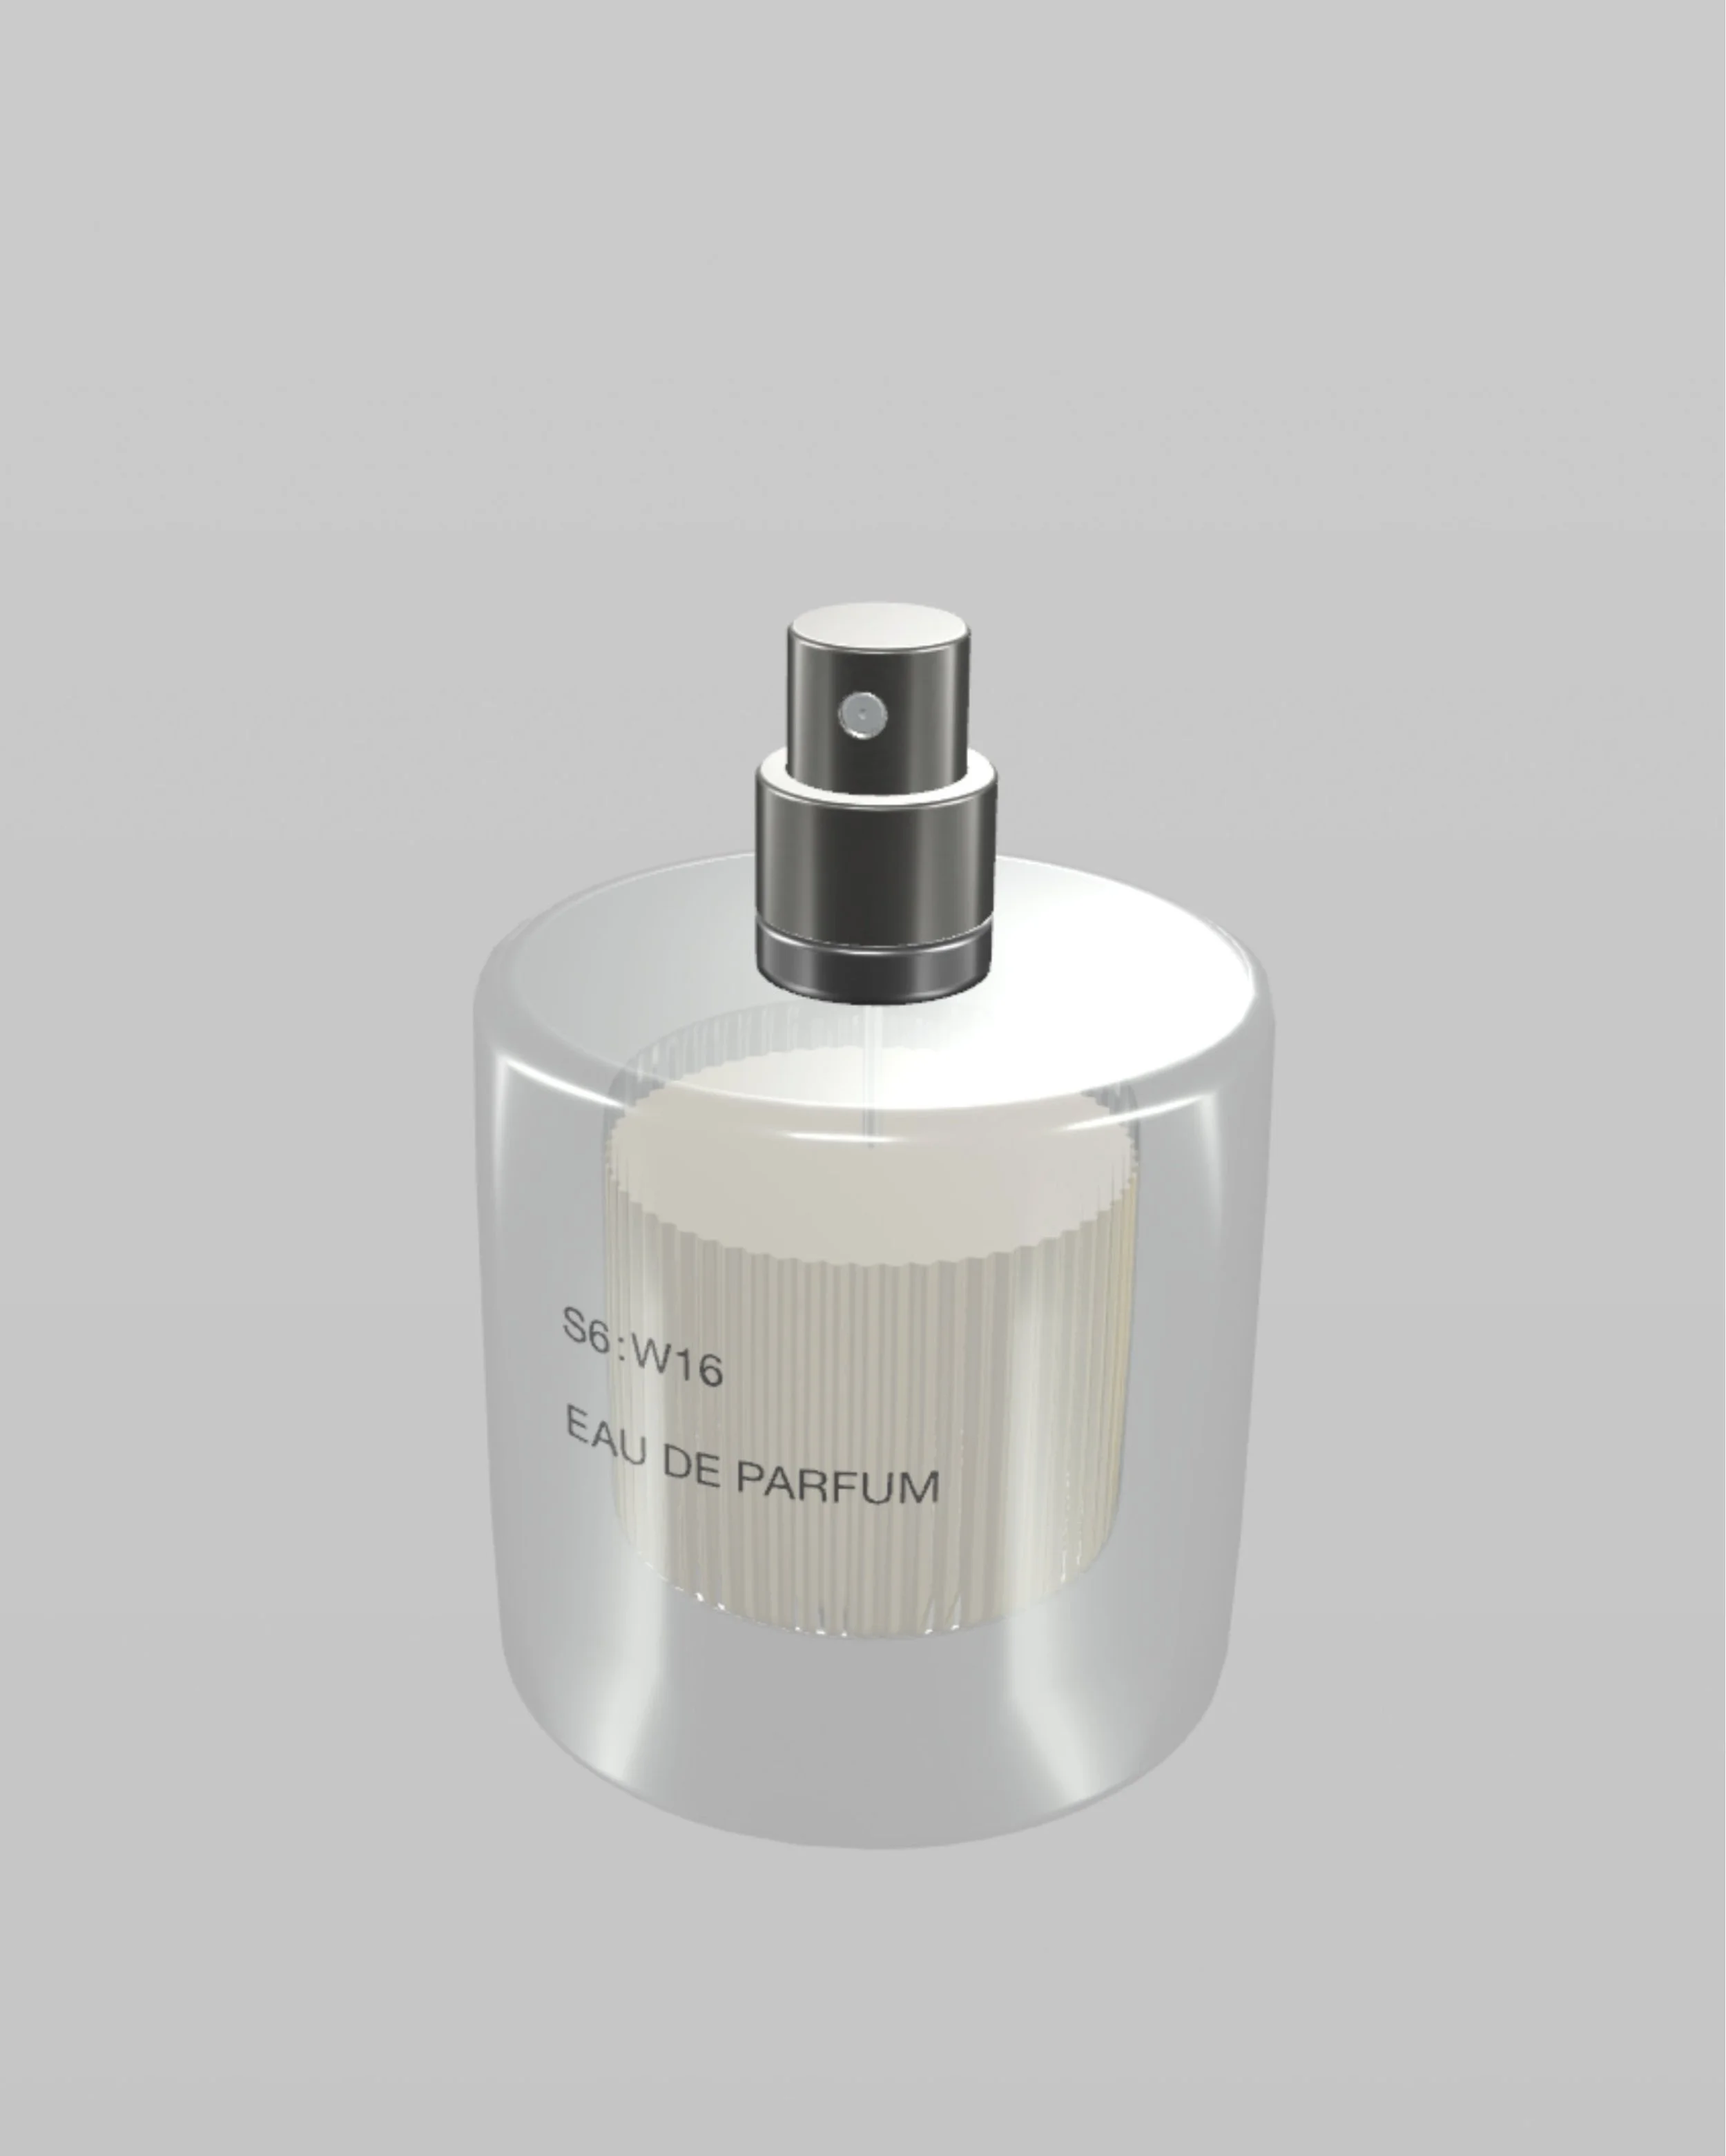
Opaque materials like metals or plastics are usually the most convincing. In the case of transparent materials like glass or liquid, RealityKit² still needs to improve. A lot. Glass looks more like awful transparent plastic, and I came across some issues with poorly rendered shadows under glass objects. You don’t usually see this problem in the proper unbiased render engines with physically-based material. And for now, we can only dream about rendering the translucent subsurface scattering or caustics, too. Down below, you can see some examples of objects I tested.
² The render engine is inside the RealityKit framework developed by Apple for building augmented reality.
[you can expand the images by clicking on them]


Apple’s Vision Pro (left) was a great baseline and source of inspiration.
An autonomous plant pot (right) was exported straight from Fusion 360 using the software’s USDZ export settings. There is plenty of room for improvement, but for this article’s purpose, no additional changes were made to show you how your model could look without spending any time with texturing or creating the materials.


Speed shape (left). This was the first project I used for the study of augmented reality.
Composition of the perfume bottle (right). As you can see, the glass material doesn’t look good.

Modular shelving system with multiple products on the shelves.
REAL-TIME, LIGHTING, REFLECTION
The materials do not behave according to the light in your space when viewing through augmented reality. It looks like that only brightness and shadows adjust with the environment data captured by your camera. So, we’re going to find out what’s going on here. I created a sphere with mirror-like material to show you how it reacts to the environment.

As you can see, the sphere picks up the cutting mat and reflects it on its surface, nonetheless, everything else was replaced with the artificial HDRI³ background, which looks like a sky with trees. In reality, I was inside the room. Also, notice the specular reflection of symmetrical studio hard lights. The render engine mixed exterior with interior and studio light all together.
³ HDRI stands for High Dynamic Range Images. In this 3D context, HDRI images are a source of background and lighting information often used to accurately illuminate the scenes.
Next, I move the sphere next to the strong light source. The light is fixed to the object, doesn’t match the space, and doesn’t adjust in real time.


The process of how the materials are interpreted involves blending the artificial studio lighting with HDR images and adjusting the model's brightness to match the camera's settings. Additionally, some nearby reflections are picked by the object. The result lacks consistency, realism, and conviction.
I understand that the range of captured data from the camera is limited. However, just as you had to move your iPhone without LiDAR to capture information about your space, you could similarly gather information about lightning and objects around you. If this was the case, it could produce something like an HDRI map to help the model blend with the environment better.
Another issue I encountered was that augmented reality understands your space and what’s behind the object perfectly, nonetheless, there are issues when something is in front of it. This might not be a big problem in most cases, but still. I feel this could be addressed in the near future, according to the upcoming Vision Pro, whereas I can’t imagine something like clipping objects in front of your virtual objects. The question is whether the fix will be available outside Vision Pro hardware.

As is evident, there is a subtle zoom in and out, which means the camera tries to focus on the book in front of it. It seems that the camera can recognize objects in front of it and determine the position of your virtual object in space pretty accurately. That’s why I am not sure if this is more of a problem caused by hardware limitations or if the software wasn’t designed to account for a movement in front of the object.
CONVERTING
If you are one of those fortunate users whose 3D software of choice implements the USDZ export, this chapter isn’t for you, and maybe you should skip to another, but if you are not (like me), you’ll find that it’s really easy to convert any 3D object into Apple’s RealityKit.
01
The first step is to download and launch Reality Converter. To download the app, you need to go to Apple’s Developer website, I will link you there: Augmented Reality – Apple Developer
02
Then, export your geometry in .obj or .fbx file format. Before export, be sure to prepare your geometry and materials. I am not going to go into details, but in general, it is good to export your mesh as fine and small as possible and assign proper materials for each part of the objects. There’s a chance that you have already done this as a result of your workflow. The chance is that you already did this for some rendering purpose. In this case, some of your materials can be exported with textures and transferred into a Reality Converter.
03
Now, drag and drop your .obj or .fbx file into Reality Converter. That’s it—since now, you can export it as a USDZ file, but you probably won’t until you complete your materials.
screenshot of Reality Converter user interface
—
Ok, it’s not that simple for everyone. My workflow, and maybe also yours, typically involves modeling software, where I deal with the modeling, UV mapping, geometry, and rendering software, where I export the clay model and complete the scene, set cameras, create material, and more. (Yeah, call me old-school.) Thus, I can’t transfer materials or geometry from my render engine to the Reality Converter.
The solution is re-exporting the geometry with clay-like materials attached to each object. This is important because every material is baked into the geometry, so you can’t change it in the Reality Converter later. These materials don’t need to be complex, but it’s necessary to make something that should be recognizable as a material during the converting process. Assigning a different color for different parts of the objects does the trick for me.
Then, textures needed to be re-created for two reasons. Firstly, to reduce the size of the USDZ file—I usually work with high-resolution textures in my renderer. Secondly, limitations in the materials that can be created and used in RealityKit require some creativity to find a workaround. Therefore, you cannot expect your newly created materials to behave the same way as they used to in a proper, physically accurate render engine.
WORKING WITH MATERIALS
Selecting a material can only be done from the dropdown menu—you can’t pick a material in the viewport. The viewport is for model viewing only.
Some materials could come out of the Reality Converter dull, but there is a way to change their look by replacing the texture maps. Reality Converter does not offer many options. You basically have just nine slots—each can be filled with one texture map, as shown in the screenshot below.

Naturally, you wouldn’t use all slots for any material at the same time because it doesn’t make sense to create something like emissive metal with lower opacity. So, your actual options are even more limited, and to make your life harder, the first slot, named Base Color, wouldn’t let you set the color using standard RGB, HSL, or HEX values. Instead, you need to insert an image of the color. Hence, if you're working with a simple one-colored material, you have to prepare an image with a solid color. I tend to use 5 x 5 px images to save on file size. Yeah, ridiculous…
Your workflow includes switching between the Reality Converter and your vector or raster editor to create or edit the texture's colors, brightness, contrast, blends, HSL values, and other adjustments. You repeat this process until you are satisfied with the result in the Reality Converter.
Reality Converter is primitive, but it converts your 3D models in the end, so you can’t comply, right? On top of that, it’s still in beta, and new features could be implemented (although, so far, only the user interface has changed from its release in January 2020). Luckily, Reality Converter isn’t the only option you have because when it comes to creating apps, Apple always finds a way to make not just one but two. After converting your model inside the Reality Converter, you can work with your new USDZ file further, for example, in the Reality Composer Pro.
REALITY COMPOSER PRO
Reality Composer Pro is a new version of the previous non-pro version (which in some aspects looks more pro than this if you asked me). It seems like Apple killed the non-pro version on macOS and replaced it with the new pro version. However, you can still access non-pro versions on iOS and iPadOS (or download an older build for macOS). I am not willing to spend my time in the past, so let’s focus on the pro version.
Surprisingly, you can’t download Reality Composer Pro as easily as Reality Converter. It’s hidden inside the latest version of Xcode (currently in beta), so you need to download the Xcode first, then launch the Reality Composer from the menubar.
In the app, you will be pleased to see more options, sidebars, and coordinates, which are essential while working with 3D space. So, now you can move, scale, and rotate your object using real-world units. Even more, there is a hierarchy of your objects and materials, and you will see individual components of your model with the original names you set in 3D software. So now you know that when selecting wheel_1_brake, only the wheel’s brake will be selected and not the entire scene. Additionally, you’ll be able to move, rotate, scale, or hide it as well. Amazing!
screenshot of Reality Composer Pro user interface
Hang on! Not so fast. You still can’t do more complex things. I am not even sure if they are that complex. To be honest, most of them are just elementary features, like deleting or changing the geometry, switching normals, changing the cameras, or using an orthographic view to compose your objects easier (it’s called composer, God damn it!). This is a shame, mainly because your only camera is too wide.
One thing you can do is play with the materials. Finally, you can break baked materials and replace them with others or new ones, and this time, you’re not limited to a maximum of nine texture maps. The Reality Composer heavily relies on textures, the same way as Reality Converter does, but at least you don’t need them to make changes to the roughness, opacity, and others, for example. However, you can’t adjust both textures and values at the same time. Next, you’ll be able to change the base color using a standard macOS color picker. Ok, I know it’s not the best out there, but now you can work with RGB, HSL, or HEX values. So-called Advanced options let you input specific properties like the Index of Refraction, which works just as you imagine. And that’s it. RealityKit does not really work with truly advanced material properties, like IOR Measured Data, subsurface properties, Fresnel or anisotropy reflection, or Abbe’s law of dispersion—not a surprise over glass render quality.
To be fair, there is a way to work with anisotropy reflections, but it requires coding, as shown in the screenshot below. I am not a programmer, and this shouldn’t be a programmer thing.
screenshot of Apple Developer Documentation
Reality Composer Pro has two types of materials to choose from: Physically Based and Custom. We already covered the Physically Based materials. Custom materials kind of compensate for the absence of layers in the Physically Based Materials and are built differently using the so-called Shader Graph. A Shader Graph is a standard node-based material editor. This technique/or pipeline is common in the majority of 3D software. I am not a fan of this technique, nonetheless, that’s subjective. Objectively, to work with the Shader Graph node editor, you need to switch from Physically Based material to Custom or choose Custom when creating new material. These Custom materials can use multiple effects, animations, or particles—basically, all the shiny, flashy stuff teenagers or Minecraft, as well as Roblox players under PG 12, adore.
To trade physically-based material (yet not convincing materials so far) for something custom-made feels like a downgrade from the view of achieving realism, but I feel like this is not the case here; it is more for artistic purposes, and I am sure there is a way to build these materials to behave the same as physically-based anyway—due to the render engine lack of realism and quality limitations.
Shader Graph—the structure of preset material
Again, the Shader Graph node editor feels more like coding than any other node editor I have ever seen. Unfortunatelly. I don’t know why I am even surprised. Since this app is hidden inside Xcode—the app designed to develop and distribute apps using code. Nothing for us here, but for those interested in coding, you can build up your model inside the Xcode interface using code, and it seems that you can adjust and even expand its possibilities. I am definitely not a fan of this approach, either. So, I focused on the Physically Based Material editor, and, in the end, I was able to enhance multiple materials mainly because the interface allows you to experiment more precisely and faster.
ENHANCING THE MATERIALS
In the example below, you can see a project of a modular shelving system exported from Reality Converter and then enhanced using Reality Composer Pro material editor.
The enhanced version is always on the right.
[you can expand the images by clicking on them]


The most visible change is the reflection of the light on the aluminum shelves. The material’s index of refraction was changed to the proper value, and the surface was adjusted to appear rougher by offloading the texture map and changing the strength value. Other materials were adjusted similarly. The result shows a nice, soft reflection—a more balanced and realistic look. (The lighting in both scenes is the same—you have no option to change it.)


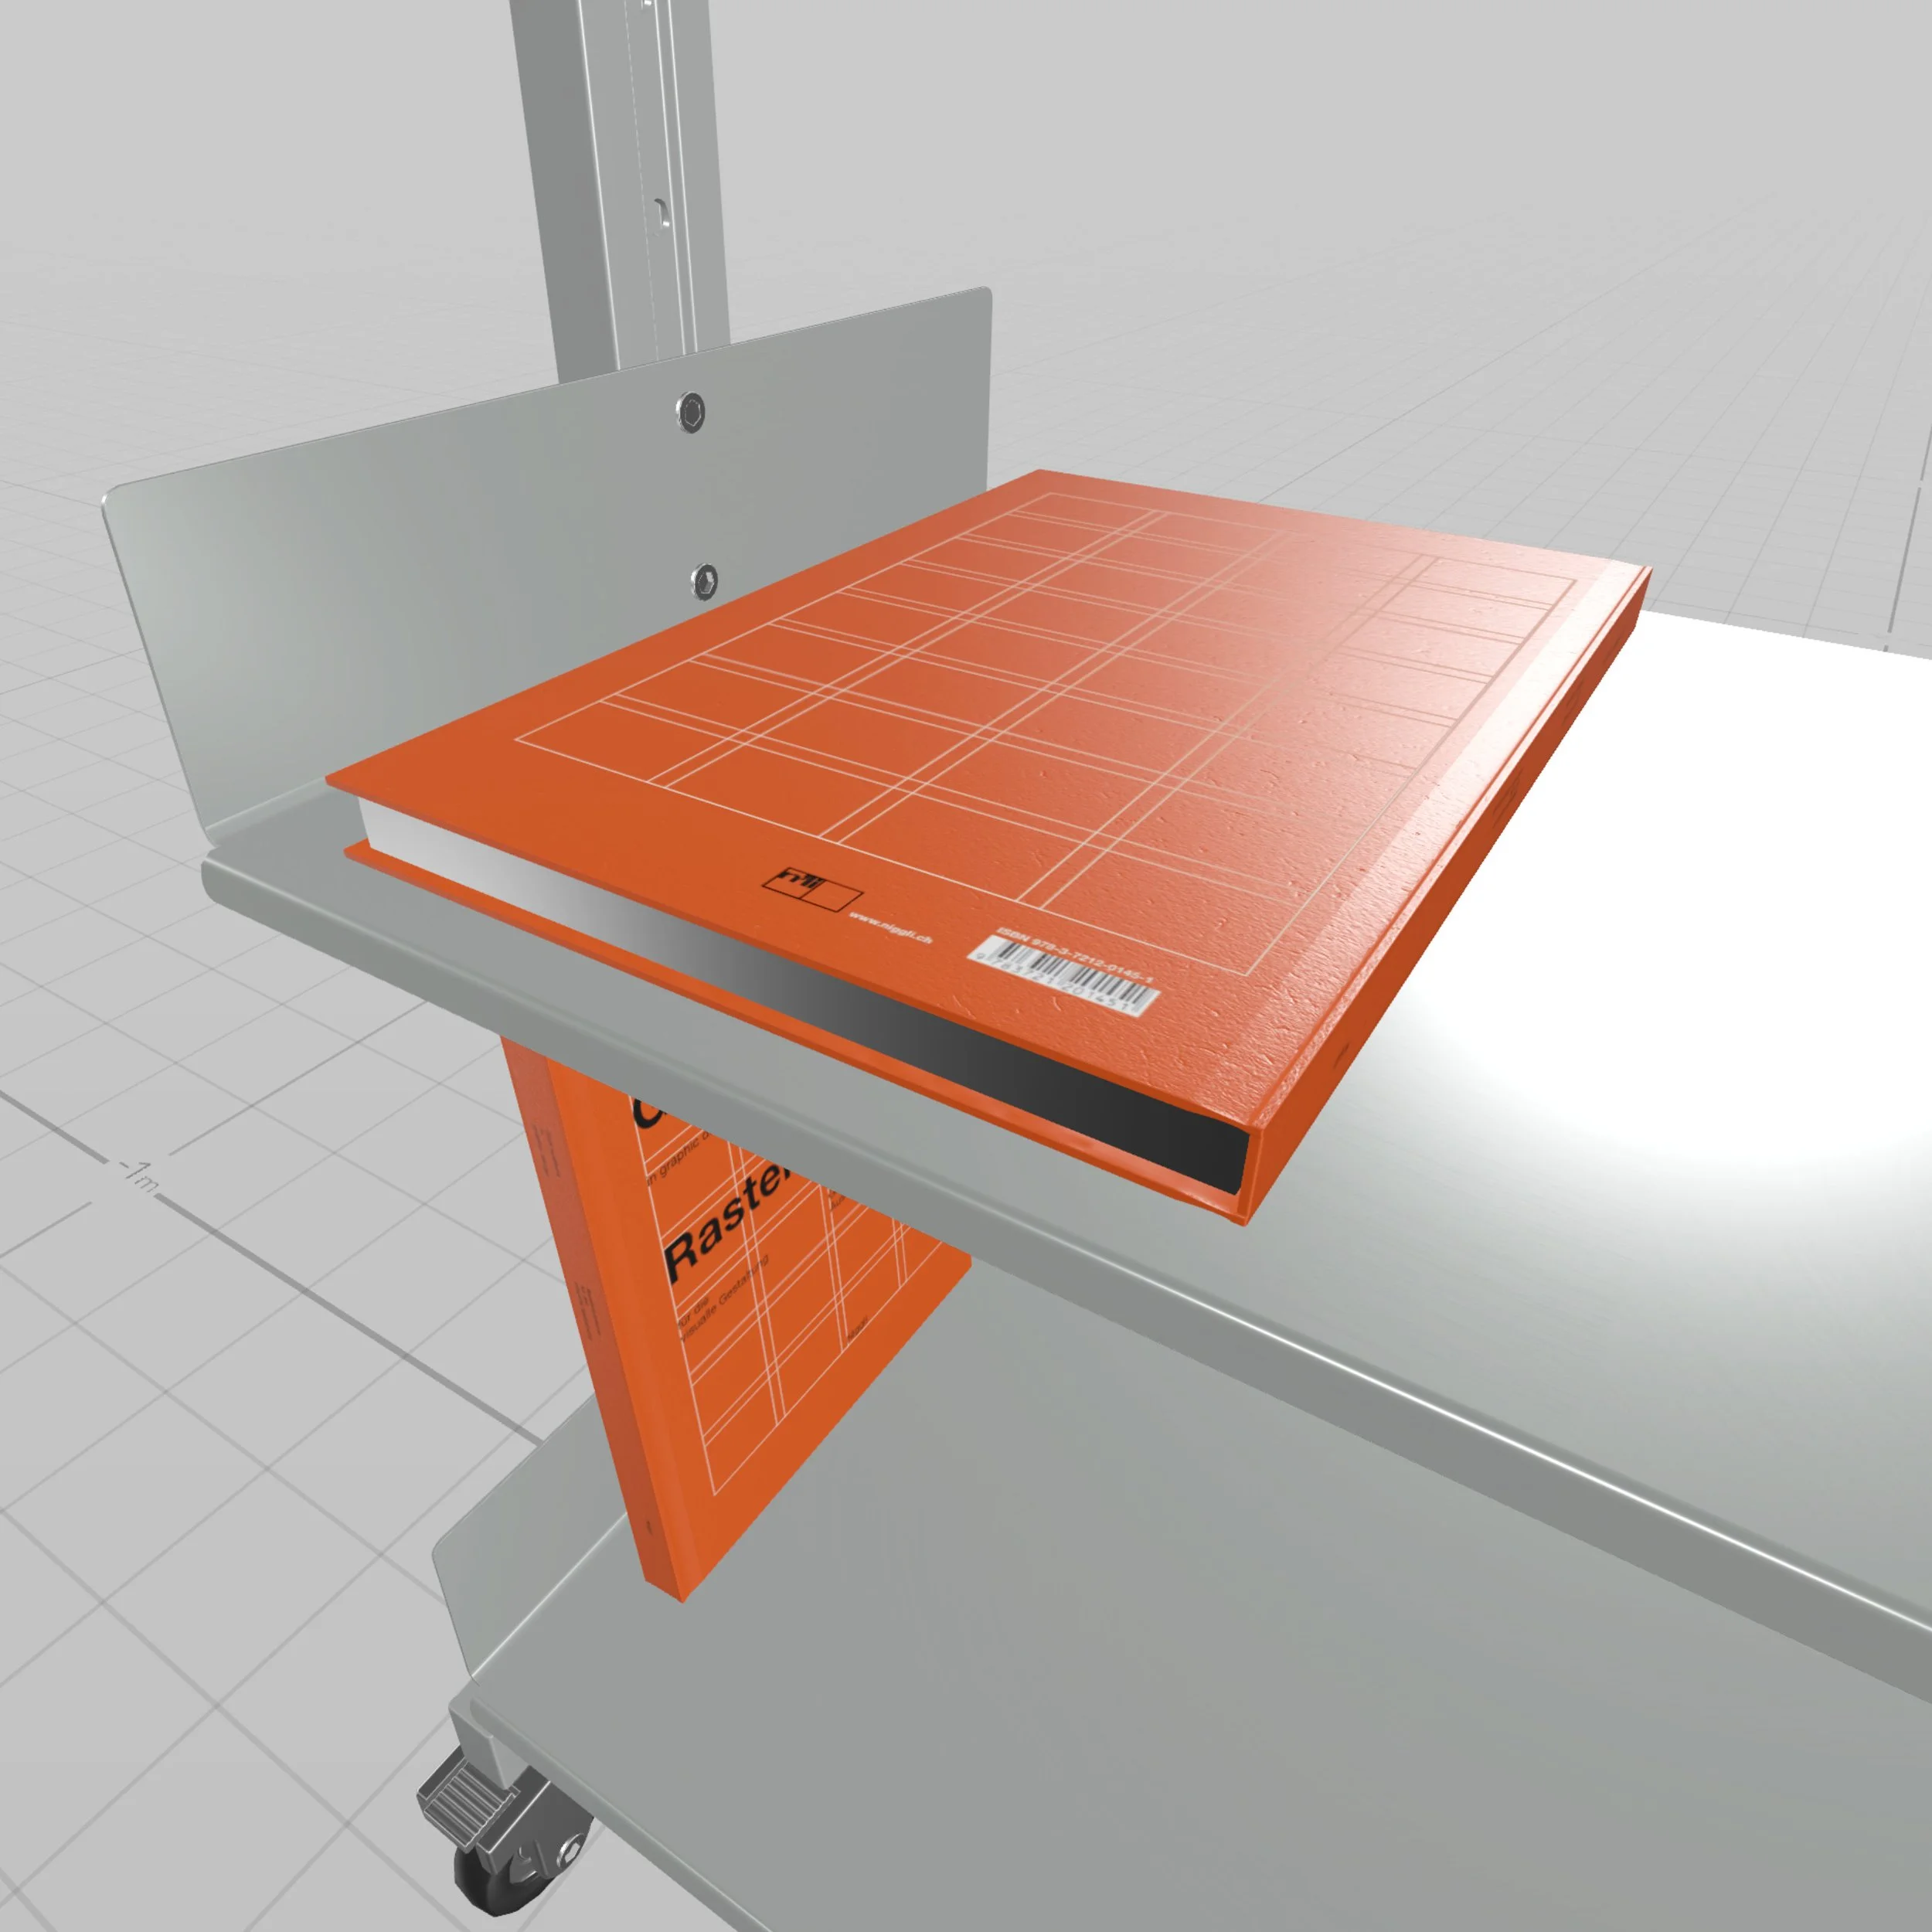
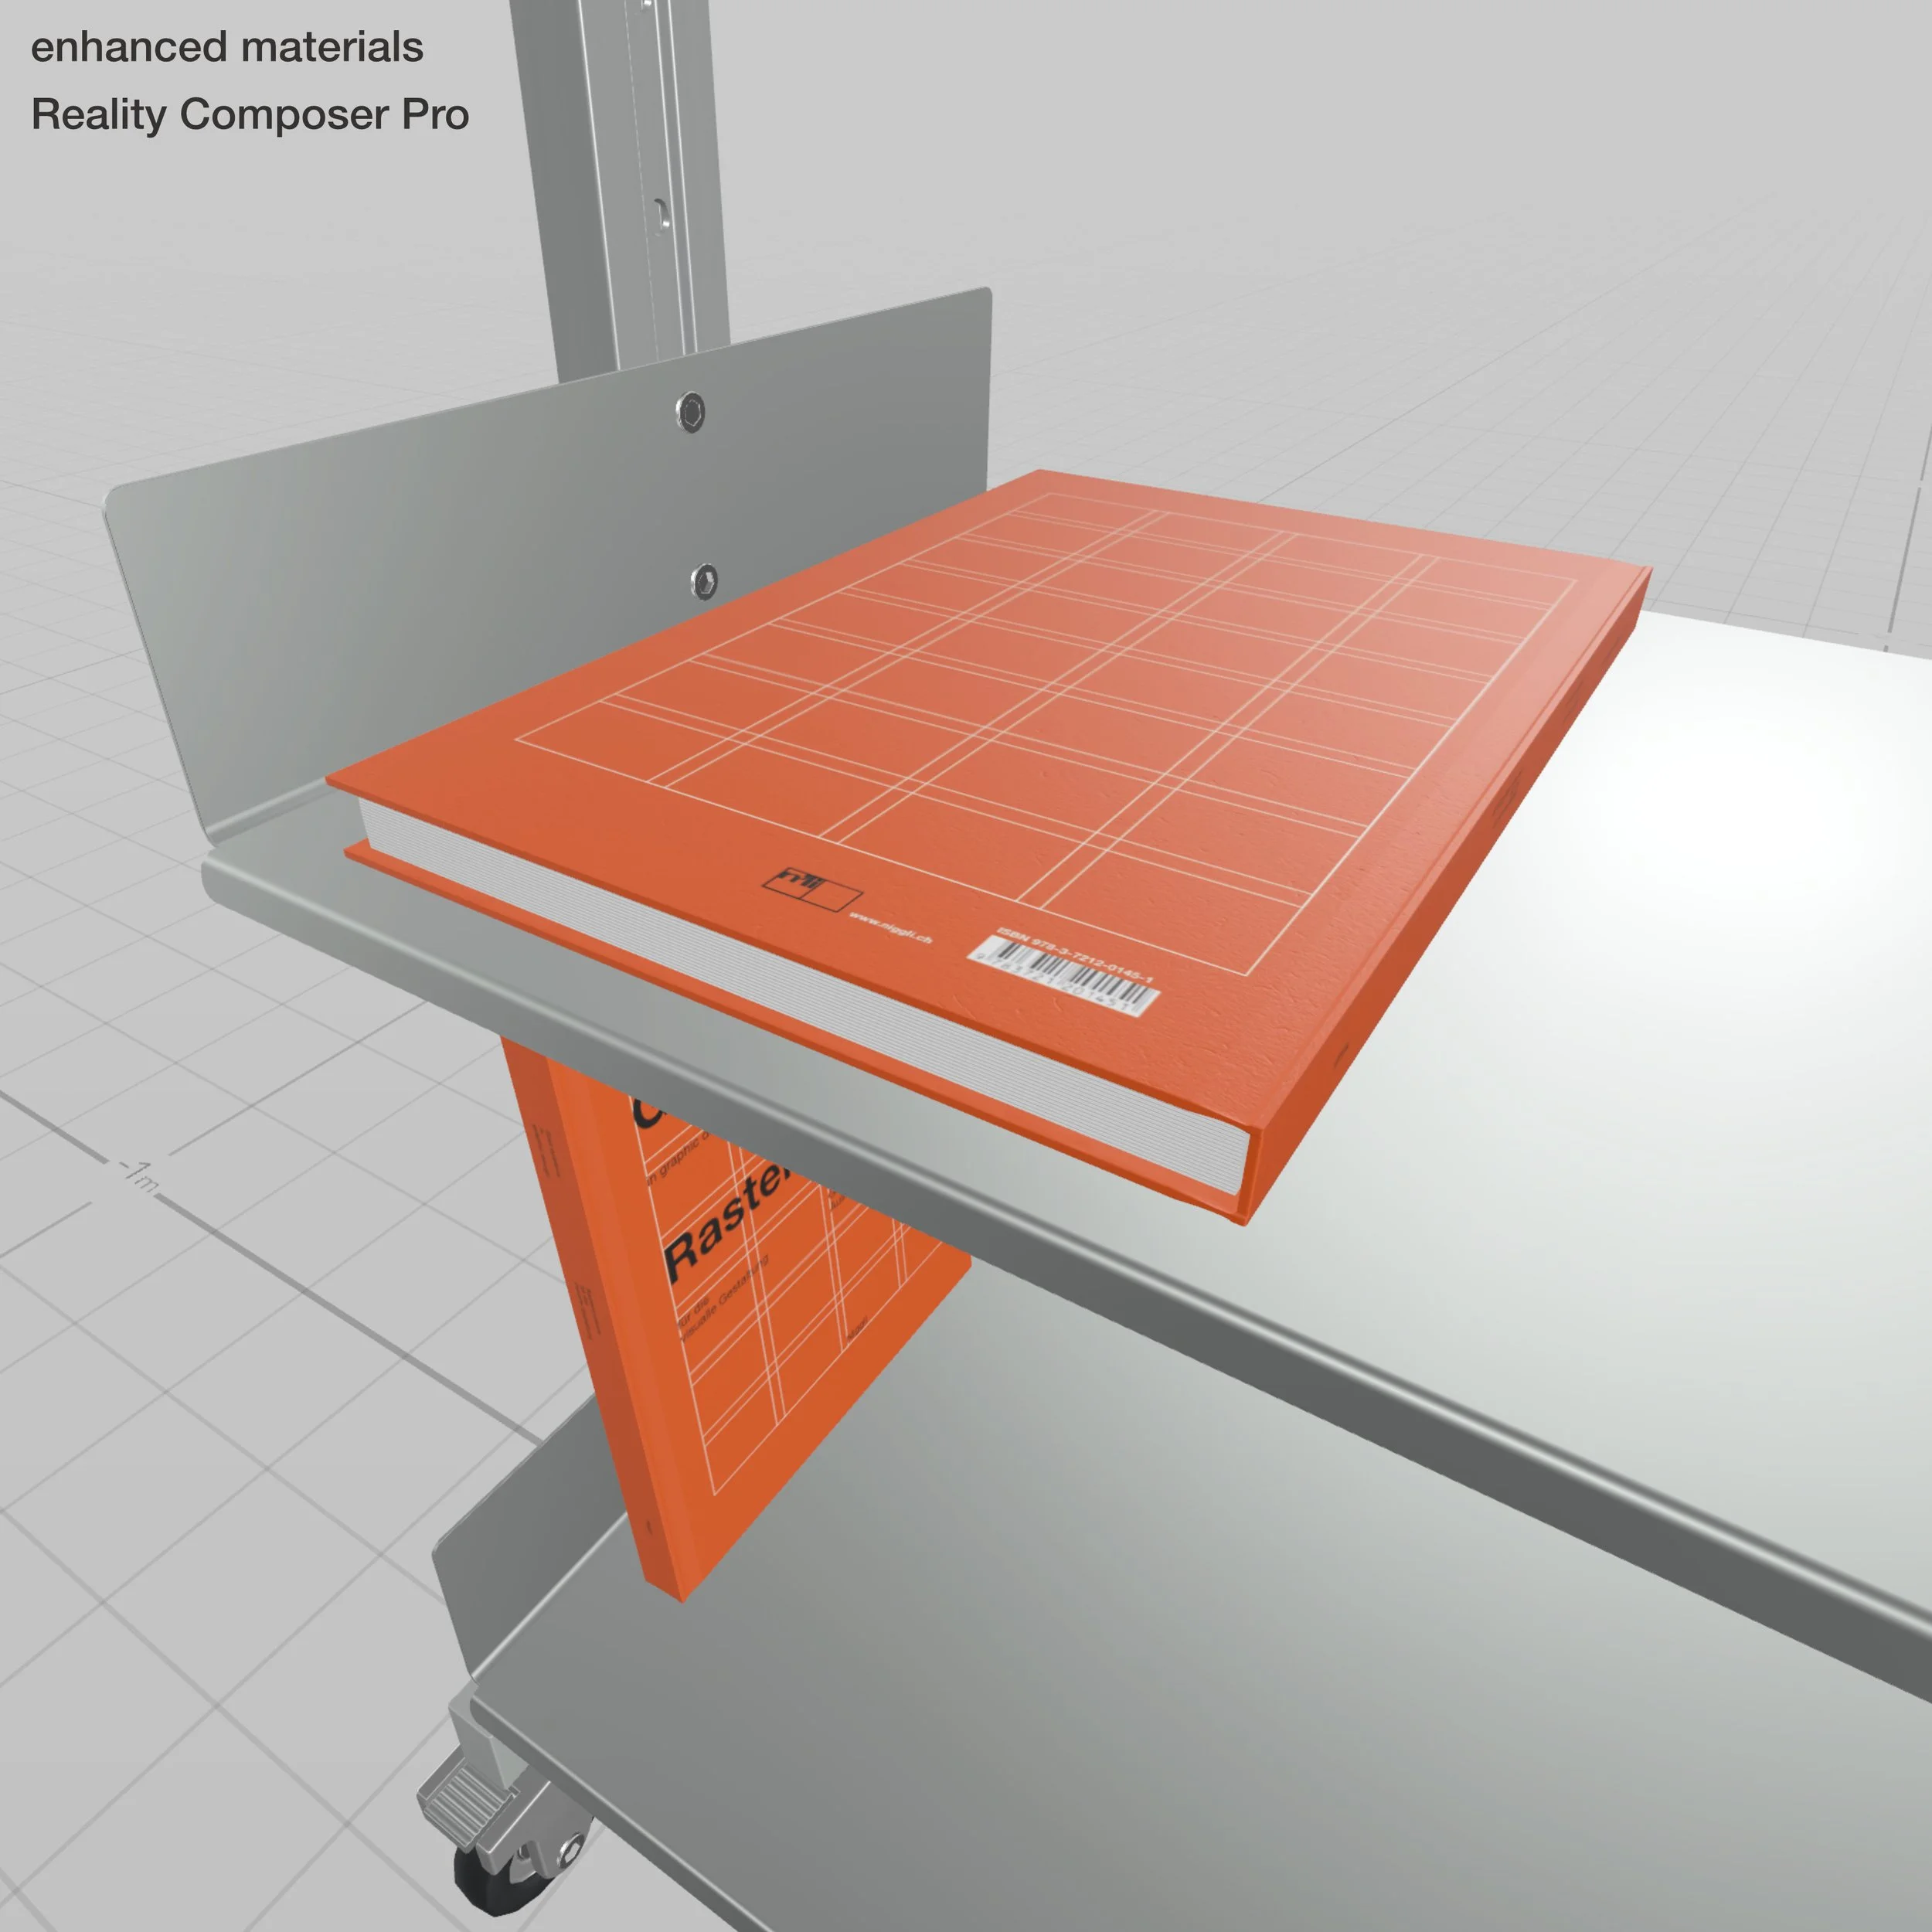
The book needed much more care; the pages from the sides look weirdly metallic, so I attached a texture with a few lines, and UV mapping takes care of distribution. From a close range, you can tell something is going on there, and from afar, the texture is not as prominent and does not bother your eyes. Both covers and spine needed some work, mainly to reduce overall reflection while preserving some of it on the darker ink and coating. So, the new texture was created and imported into the clearcoat slot. You will probably tell that the changes added to the realism.


Some more angles on details. New texture maps introduce imperfections, which add to realism.
—
Unfortunately, the limitations of the render engine will also translate here, so it doesn’t matter how much effort you put into fixing the glass material on the perfume bottle. After some changes in the editor, you may think it looks better when compared with the original converted version, but when you try the model inside augmented reality, it’s still poor. To sum up, the more transparent your material is, the more you should check its behavior in the real world, or better, forget about transparent materials at all.


To better understand, below is a comparison of how the glass material should look like and how it looks inside the Reality Composer Pro. I also included more renders to showcase how the glass behaves from other angles. You will see the difference is massive. You most likely wouldn’t believe me that it's the same object, but it is. Same model—different render engines.
The perfume bottle is rendered using Maxell Render.
[you can expand the images by clicking on them]


—
An interesting discovery (ok, maybe not that interesting after all) was that Apple includes presets of materials, but none of them is transparent, as shown in the screenshot.
[you can expand the image by clicking on them]
TRUE PHYSICALLY-BASED RENDERING
I mostly came from Maxwell Render, which is old today but once was way ahead of its time and still holds the bar among modern render engines if we talk about physically accurate solutions, simulation, and realism. The material editor in the Maxwell is straightforward and relies on real-world material properties. I’ll be a little more technical here, although I think it is necessary to understand how simplified the Reality Composer materials and render engine are. It feels kind of a step back to the past in some way.
Maxwell Render may look complicated at a glance, especially for beginners, but the good news is that all these parameters are easy to search using Google. For example, let’s suppose you wish to simulate stainless steel, and Google tells you that the alloy is made of 83 % iron, 15 % chromium, and 2 % other metals, like nickel and carbon. In that case, you can replicate this using the presets of these metals with the same layer values as the alloy’s composition.
How reflective are most plastic materials? Google knows that it’s usually between 1.50 – 1.57; if it is more like a rubber or silicone material used, for instance, liquid silicon used in Apple’s accessories such as watch bands or phone cases, it’s between 1.40 and 1.41. What about Fresnel’s law of reflection? Maxwell has got you covered because it uses real-life units of measurement, making it very easy to learn. After some time, you possess the knowledge and start to orient in these values, and if you are not familiar with them, you can search for them. Additionally, you are able to use real-world measurement files called IOR.
On top of that, all texture maps could be edited within the material editor, and you can still influence their strength. Compared to the RealityKit render engine, Maxwell Render is an unbiased path-tracing renderer. It means that Maxwell decides how materials should behave through calculations of millions of light rays bouncing around the scene until virtual photons reach the virtual sensor of your virtual camera. Maxwell uses the spectral rendering technique, which calculates real wavelengths of light and uses radiation equations to simulate output colors in different light sources instead of relying on pixel RGB values.
And what about optics, sensors, and cameras? Open Maxwell in front of a photographer, tell him how to move around the scene, and you will get good results. If you never hold the camera in your hands, the photographer will teach you how to use the camera in Maxwell, and if you want to learn, you don’t have to search for tutorials about working with a Maxwell Render camera. Instead, you search for photography tutorials. The point is that everything is based on real life. This is physically-based rendering. You are not cheating, and even though you are allowed to, it’s not at the expense of realism. That’s how unbiased render engines work (in their purest form). No shortcuts, no tricks—simulation.
Here, I am going to compare the image rendered in Maxwell with the most refined RealityKit model, which is the modular shelving system. From the front, the difference is relatively small. Maybe there’s even a slight advantage of using wide RealityKit’s camera because, in this view, it shows more from the model, which could be pleasing and look closer to you. Looking from the angles reveals a different story once again, but overall, I’m pretty happy with this RealityKit result.
[you can expand the images by clicking on them]


Try out the modular shelving system in your space and share a screenshot with us: modular shelving system RC Pro.usdz
Furthermore, we compare speed shape, autonomous plant pot, and to résumé the comparison, I also included the perfume bottle one last time.
[you can expand the images by clicking on them]


Of course, this realism doesn’t come for free. You exchange the result and workflow for render time. The fact is that Maxwell is probably the slowest render engine out there. Simulating everything without shortcuts takes time; obviously, that’s why many users leave the software and adopt newer engines, even if they are less accurate. Everything is about speed today; for most users, speed is the most important factor when choosing the render engine.
To better explain the difference, I made a simple matrix. In fact, it wasn’t simple at all, I spent the whole day moving the engines around the matrix. Keep in mind that this is not a scientific comparison, and you wouldn’t find a perfect list of best renderers anywhere. Every render engine has its own strengths and weaknesses; some are fast with GPU, some may not use it at all, and some may be more customizable like V-Ray and pretty accurate but also inaccurate at different setups. Also, there are situations where render engine A is faster than render engine B, but in other conditions, render engine A is slower. This also translates to Maxwell because while rendering complex materials or geometry like fur, hair, high-poly geometry, or caustics is quite natural for Maxwell, it could deal with it faster or at a similar time in comparison with other render engines. So, all these aspects were considered.
The matrix is based on two axes: speed and realism. Another important aspect could be ease of use, but that’s maybe for another discussion and could be even more biased, depending on your preferences, knowledge, and experiences.
So, this is probably how the matrix could look like when comparing some popular rendering choices today with Maxwell Render and Apple’s RealityKit anchoring the graph.
Why am I writing this? This approach of Maxwell Render is logical, in my opinion. I would like Apple to steal some ideas and implement them into their editor, mainly the possibility of building complex, realistic materials. It’s okay to keep it simple as it is appropriate for some purposes, but I’d love to have some advanced options, some variations between materials, to present my ideas in someone’s space in a more photorealistic manner.
Now, with all the rendering quality issues, you may understand why I haven’t been convinced by Apple’s claim about physically-based rendering.
CONCLUSION
As you have seen, RealityKit and Maxwell Render are placed at opposite ends of the matrix spectrum. The approach is way too different than I am used to. However, I enjoyed converting my models into RealityKit using Reality Composer Pro. I just wish Apple made the app more useful in the future with options to work with geometry, switch normals, change UVs, and create interactive behaviors. I think this might be very useful to present your product interactively, to visualize the product behavior better, or to let the viewer change some things like a product’s material or its color. That could be handy for customers or during the design process and development.
The decision whether to use an augmented reality model or not depends on your project’s needs and allocated time. If realism is required, I do not recommend using it—primarily not for transparent objects. Currently, I feel the app is mainly about creating a library full of 3D assets and creating scenes by combining them.
screenshot of the library of available objects; the library also includes handy categories
Despite all the cons, I am still fascinated, even if the result is unrealistic. From my experience, the general public is even more amazed by seeing something familiar in their space, previously seen only in 2D format. Until this technology gets mainstream, the quality of RealityKit could be acceptable in most situations. Only time will tell how people will use mixed reality in the future, depending also on how developers would be able to leverage the possibilities, which, in my opinion, determines the industry and direction in the end.
Converting something existing into a RealityKit scene is really easy, the same applies to the learning curve. So, there is nothing to stop you from elevating your designs; whether you are a designer, engineer, artist, or businessman who wants to implement new ideas, your clients or customers will be astonished and could make a better connection with your product or better imagine your design ideas.
We at bremay have already used this technology to present our ideas to a client who loves it. We got the job. And that’s where the idea for this journal came from.
Thank you for reading this extensive article, we value your interest.
We hope you find this article helpful and learned something new. If you notice that we have overlooked something important, please let us know. We appreciate your feedback.
Also, if you have any questions or business inquiries, please contact us by sending an e-mail request or get in touch through Instagram.